
FileLinker FileManager
Program Overview and User Guide
FileLinker FileManager lets you open two folders side by side and transfer files and folders between them. Save frequently used folder combinations as profiles. This guide takes you from starting the application to using settings shared with FileLinker.
The Main Window
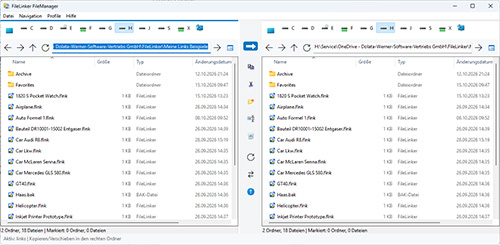
Overview of the main controls. The appearance of the icons depends on Windows and the selected theme.
The menu bar contains File, Navigation, Profiles, and Help. The central toolbar provides the most common file operations. Each file pane has its own drive, navigation, path, and view controls.
Note: If FileLinker FileManager is already running, starting it again brings the existing window to the foreground. A second application window will not open.
Opening Folders and Selecting Files
Opening a Folder by Its Path
1. Click the path field above the file list you want to use. The entire existing text is selected, even if the field was already active.
2. Enter the folder path, for example C:\Projects\Client A.
3. Press Enter or click the icon to open the entered path.
Press Ctrl+L to go directly to the path field of the active pane. Double-click a folder to open it. Double-click a file to open it in its associated Windows application.
Drives and Network Locations
Click a drive letter to open its root folder. Mapped network drives also appear with their drive letters. The Desktop icon opens the virtual Windows Desktop view.
The Network icon at the end of the drive bar opens the Windows network view in the corresponding file pane. If you know the network share, you can also enter a UNC path such as \\Server\Share\Projects in the path field. The share must be accessible, and you must have the required permissions.
Navigation and Views
Back and Forward take you to previously opened locations. Up opens the parent folder. Refresh reloads the current view; Ctrl+R refreshes both panes. Ctrl+U swaps the folders open in the left and right panes.
Use the View icon to choose Icons, List, Details, Thumbnails, or Tiles. Details view displays file information such as name, size, type, and date modified. The columns shown also depend on the Windows folder type.
Selecting Items and Identifying the Active Pane
Click an item to select it. Use Ctrl+click to select multiple individual items, or Shift+click to select a consecutive range. The status bar shows the number of folders, files, and selected items.
The active pane is the source for file operations. It is identified by a blue line above the list and the message bar. The large direction arrow points toward the opposite destination pane. Click a file list or press Tab to switch the active pane.
Tip: Hover over a control to display its tooltip. Right-click in the file list to open the Windows context menu.
Copying and Moving Files and Folders
Copying Files
1. Open the source folder in one pane and the destination folder in the opposite pane.
2. Click the source pane and select the files or folders you want to copy.
3. Check the direction arrow: it points from the active source pane to the destination.
4. Click Copy, choose File → Copy to Other Pane, or press F5.
5. Check the number of items and the destination path in the confirmation dialog. Click Yes to proceed or No to cancel.
Copying leaves the original files and folders in the source folder. Windows may display additional dialogs, for example if files with the same names already exist or you do not have the required permissions.
Moving Files
1. Open the source and destination folders, then select the items to move in the source pane.
2. Click Move, choose File → Move to Other Pane, or press F6.
3. Check the destination path and click Yes to proceed. Follow any additional Windows prompts.
Once the move is complete, the items are in the destination folder and no longer in their original location. Both file lists refresh after the operation.
Canceling and Checking Results
Click No in the initial confirmation dialog or Cancel in a subsequent dialog to cancel the operation. Focus returns to the originally active pane. This also applies when working from the right pane.
Windows displays progress for larger transfers. If you cancel, some items may already have been transferred to the destination. Check both folders before starting the operation again. The message bar indicates whether an operation was completed or canceled, or whether items were skipped.
Destination Requirements
The destination must be an actual file system folder. A virtual view such as This PC or the network overview cannot be used directly as a copy destination. First open the folder or specific network share you want to use.
The source and destination folders must be different. A folder also cannot be copied or moved into itself or one of its own subfolders.
Practical example: Open your CAD drawings in the left pane and a client project's document folder in the right pane. Select the approved drawings and press F5 to copy them to the project folder.
Creating, Renaming, and Deleting Folders
Creating a New Folder
1. Open the folder in which you want to create a subfolder and activate that pane.
2. Click New Folder or press F7.
3. Enter the folder name and click OK. Click Cancel to leave the current folder unchanged.
Enter a single valid folder name. Path separators and other characters that Windows does not allow cannot be used with this command.
Renaming a File or Folder
1. Select exactly one file or folder in the active pane.
2. Click Rename or press F2.
3. Enter the new name and click OK.
When renaming files, keep the file extension, such as .dxf, .pdf, or .docx. Changing the extension may prevent Windows from opening the file in the correct application. This command cannot be used to rename drives.
Moving Files or Folders to the Recycle Bin
1. Select the items you want to delete in the active file list.
2. Click the Recycle Bin icon or press F8 or Delete.
3. No is selected and has focus in the delete confirmation dialog. Pressing Enter cancels the deletion. Explicitly choose Yes if you want to proceed.
Folders are processed together with their contents. You can restore deleted items from the Windows Recycle Bin, provided Windows actually moved them there.
Important Recycle Bin Information
The application's Recycle Bin command is limited to local hard drives. This command does not delete items from network shares or removable media. Even on local drives, Recycle Bin settings, file size, or cloud availability may prevent items from being moved to the Recycle Bin.
If Windows warns that an online-only file or folder would be permanently deleted, choose No to avoid permanent deletion. With OneDrive, it may help to select Always keep on this device first and wait for synchronization to complete.
When multiple items are selected, some may already have been moved to the Recycle Bin before a later item causes the operation to stop. Check both the Recycle Bin and the source folder. Context menu commands and drag-and-drop follow Windows rules; the safeguards described here apply to the application's own Recycle Bin command.
Saving Folder Combinations as Profiles
Each of the five profile slots stores the left and right folder paths and the view mode for each pane. This lets you reopen frequently used working environments without selecting each folder individually.
Saving a Profile
1. Open the folders you want to use in the left and right panes and set their view modes.
2. Open the Profiles menu and select one of the five profile slots.
3. Choose Save and enter a name containing 1 to 80 characters, such as CAD and Documents.
4. Click OK. If the profile slot is already in use, confirm that you want to overwrite it.
Tip: Use names that describe your task, such as Client Projects, File Exchange, or Drawings and Approvals. A profile stores paths and view settings; it does not create copies of your files.
Loading a Profile
1. Open Profiles and select the saved profile you want to use.
2. Click Load. Both folders and their view modes are restored.
Before loading a profile, the application checks that both locations are accessible. If, for example, a network connection has been disconnected or a folder has been removed, an error message appears. Restore access or save the profile again with valid paths.
Deleting a Profile
1. Open the relevant profile slot and choose Delete Profile.
2. Confirm the prompt. The profile slot is then available for reuse.
Important: Delete Profile removes only the saved folder combination. It does not delete any referenced files or folders. Load and Delete are disabled for empty profile slots.
The Last Session
When you exit FileLinker FileManager, it also saves the most recently opened folders and view modes as the last session. These are restored the next time you start the application, unless a valid shared startup path is specified in FL.INI. Your five named profiles are retained.
If a folder from the last session is no longer accessible, the application uses your user folder instead. A startup path specified in FL.INI does not prevent you from loading a different profile afterward.
Commands and Keyboard Shortcuts
The top menus and their corresponding toolbar buttons run the same commands. Menu items display keyboard shortcuts separately beside the command. The main shortcuts work regardless of the selected application language.
| Shortcut | Action |
| F5 | Copy selected items to the opposite folder |
| F6 | Move selected items to the opposite folder |
| F7 | Create a new folder in the active pane |
| F2 | Rename a single selected item |
| F8 or Delete | Delete selected items using the application's Recycle Bin command |
| Tab or Shift+Tab | Switch the active pane |
| Ctrl+L | Select the path field of the active pane |
| Ctrl+R | Refresh both file panes |
| Ctrl+U | Swap the folders open in the left and right panes |
| Alt+Left Arrow | Go to the previous location in the active pane |
| Alt+Right Arrow | Go to the next location in the active pane |
| Alt+Up Arrow | Open the parent folder |
| Enter in the path field | Open the entered path |
Shortcuts When Editing Text
When editing a path or file name, standard text editing takes priority. Delete removes text or characters instead of triggering a file operation. This helps prevent unintended file operations. For file list navigation shortcuts, place focus in the file list first.
Shift+Delete in the file list also invokes the application's Recycle Bin command; it does not provide a separate permanent deletion function. Native Windows context menus may offer other delete commands.
Help and Exit
Choose Help → User Guide / About FileLinker FileManager to open the built-in instructions. Choose File → Exit or click the window's Close button to exit the application and save the last session and window settings.
Window Position and Troubleshooting
Window Size and State
If no window position has been saved, the main window opens in the center of the screen at a default size of 1280 × 800 pixels. When you exit, the position, normal window size, and window state are saved in FileLinker_DateiManager.ini.
| Saved State | Behavior on Next Startup |
| Normal window | The saved position and size are restored. |
| Maximized window | The window opens maximized again. |
| Minimized window | The window opens in its normal state, centered on the screen, using the saved normal size. |
When restored, the window position is adjusted to fit the monitor's available work area. The two file panes share the available space equally. Maximized means a maximized Windows window; there is no separate borderless full-screen mode.
A Folder or Network Share Will Not Open
Check the path, network connection, and your access permissions. Try opening the same folder in Windows File Explorer. If a mapped network drive is disconnected, reconnect it first. Then press Ctrl+R to refresh the file lists.
Files Cannot Be Copied or Moved
Select the items you want to transfer first. Open an actual destination folder in the opposite pane and check that the source and destination are different. If a file is locked, close the application using it. Refer to the specific Windows error message for details.
A Profile Cannot Be Saved
Check the profile name and your access to the FileLinker documents folder. The name must contain 1 to 80 characters. Choose Profiles → Show INI Location to find the storage location.
A Deletion Was Canceled
No is intentionally selected by default in the application's delete confirmation dialog. You must explicitly choose Yes to delete items. If a cloud warning appears or the Recycle Bin is unavailable, check the storage location and file availability. Try again only after you have identified the cause.